Table Of Content
These tools enable you to create a natural and realistic appearance, enhancing the overall texture and depth of the curly hair. You should be left with fewer squiggly lines and more clearly defined strands of curly hair so the drawing will look less messy. Now you’ve been around the whole head of hair and created the main curls, go back to where you started and draw more hairs in between the existing lines. Repeat the step of drawing slightly smaller strands of curly hair flowing down from the right side of the jaw, as if the hair has been pulled forward. Now it’s time to add in some curly hair on the lower right side. Again, start from around the bottom of the first few strands you drew on this side and create a new long curl.
New York Women Draw Their Own Pubes - The Cut
New York Women Draw Their Own Pubes.
Posted: Thu, 15 Nov 2018 08:00:00 GMT [source]
Techniques and Tips
Because curly hair can be rather thick, you should leave a reasonable gap between the facial form and the top of the hair to provide volume. This will ensure that the finished picture does not appear to be excessively flat or two-dimensional. This is an article showcasing how to draw curls step-by-step Side profile guide on a Boy that will help you to in-depth study the detailed instructional process with helpful illustrations.
Step One: Part the hair
On both sides of the face, these first hair lines should come down to be in line with the nose. Curving outwards in an inverted arc, draw two lines stemming from the base of the head to represent the neck. They should touch the bottom of the two vertical lines that make the side of the face and the horizontal line at the bottom of the face. Curly hair follows what is similar to a zigzag pattern and goes back and forth. The front strands stand out and pull focus while the back strands are shaded and partially covered.
How to Draw Different Kinds of Hair: Short, Long, Straight, Wavy, and Curly
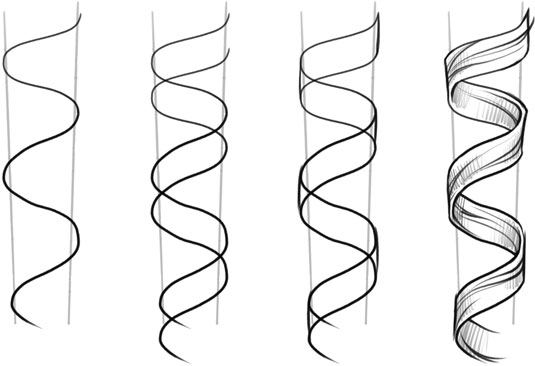
In addition to that keep in mind that you have hair overlapping so where they overlap you will want to make the shading darker. For this curl, there will be no shine on the inner edges, and when we create the shading you will want to keep the area where it folds in mind. With tighter coils, you will want to start smaller at the top and grow larger towards the bottom of the strand. Consider your light source when deciding where your hair shine will be. Following the curve we will use the ribbon technique to add another line on the areas we want to be the hair facing outwards, this will be the hair on top. Use the pencil to softly define the edges of the hair if necessary.
To make the curly hair look even more realistic, you can shade the hair using single, careful strokes of your pencil as these lines will make up individual strands of hair within the curl. For extra points, you can even draw a few wayward strands that fall outside of the main curl. The key to realistic curly hair drawing is to determine the light source, so you can figure out where the light will fall on the hair, as this will help you bring your drawings to life. Once you draw the basic head shape, it’s time to go further and draw the definite shape of hair just by looking at the reference photo of curly hair drawing.
Step 6
5 Artists on Our Radar in March 2023 - Artsy
5 Artists on Our Radar in March 2023.
Posted: Fri, 03 Mar 2023 08:00:00 GMT [source]
In this tutorial, I will introduce 4 simple steps for drawing realistic looking hair. Add the details to the curls, such as the texture of the hair, and loose strands of hair around the curls. You can also include other features such as the ears tucked behind the curls or an accessory like a hairband or scarf.
Step 3: Draw end curl to strand
And, while facial features capture the likeness of a person, hair can say a lot about their personality and style. Click here to learn how to draw one from the front and here to draw one from side. If the light source is directly in front of the hair, for example, it will shine straight onto it.
Looking at Different Curl Patterns
Continue to fill in the hair with texture, adding more lines to the hairstyle to indicate volume. To do this, move your pencil to the hair part and draw several lines in the direction of where the hair grows. These lines can vary in length, from long to short, just so long as they follow the hairstyle. Darlene created RFA In 2013 with the goal of sharing simple yet detailed drawing tutorials with other artists on the world wide web. Drawing curly hair is really fun and absolutely great for building confidence when it comes to adding texture. Evaluate the overall composition and make any necessary adjustments to ensure a balanced and harmonious portrayal of the curly hair.
HOW TO DRAW CURLY HAIR – STEP BY STEP
You know the drill at this point, so for this step of your curly hair drawing, simply keep adding in lines to the lower back portion of the hair. Before you start adding in the hair of your curly hair drawing, you should first use a curved line to draw the other side of the neck. Over top of the drawing of the head add an outline of the main shape/shapes of the hair. At this stage don’t worry about getting every small hair clump but instead focus on it’s overall volume and large shapes that define the hairstyle.
If you often find yourself getting lost in the details, this step will help you keep track of the overall lighting so you can be more confident when drawing the individual hairs. Equipped with these essential tools and materials, you are poised to embark on a captivating journey into the world of drawing curly hair. Selecting the right paper is crucial for achieving the desired effects in your curly hair drawings. Opt for a smooth, heavyweight drawing paper or a specialized sketchbook designed for pencil work. The paper should have a suitable tooth to hold the graphite while allowing for smooth blending and detailing.
So, darken around the curl’s ringlets and the underside of the curls. Draw guidelines shapes indicating the direction of the flow of the hair. But it seems that curly hair is even more complicated to draw than straight hair. Instead, I'm going to put the emphasis on establishing soft "clumps" of hair. I recommend keeping organic lines and shapes in mind—varied lines are going to look more natural. For example, coily hair isn't straight, so I like to avoid using straight lines.
Everyone will have their own preferred pencils and drawing utensils, but here is a list of optional ways you might wish to improve your drawing experience for this project. Bring these strands down to the middle of the right side of the head. Continue to bring the hair down by drawing another squiggly line on the right side of the face.
Use a range of pencils, from 2B to 6B, to create contrast and dimension within the curls. Pay attention to the areas where shadows fall and the areas that catch highlights, enhancing the three-dimensional quality of the hair. Precision erasers, including kneaded erasers and fine detail erasers, are essential for refining the delicate lines and correcting any mistakes without smudging the paper. These erasers allow for precise erasing and shaping of the curly hair strands and highlights.
However, with some practice and following a few simple steps, anyone can learn to create stunning curly hair drawings. Here’s a comprehensive guide that provides clear instructions, tips, and techniques for beginners. When embarking on the artistic endeavor of drawing curly hair, having the right tools and materials at your disposal is essential for bringing your creative vision to life. From sketching the initial outlines to adding intricate details, the following tools and materials will equip you to capture the unique beauty of curly hair with precision and artistry. By honing their skills and embracing the nuances of curly hair, artists can create captivating and evocative representations that resonate with authenticity and visual allure.


No comments:
Post a Comment